Difference between revisions of "Putty"
| Line 12: | Line 12: | ||
[[File:Putty_private_key.jpg]] | [[File:Putty_private_key.jpg]] | ||
| + | |||
| + | Select the Data category and enter your Auto login username (e.g. E12Kenneth). | ||
Go back to the '''Session''' category (in the top left) and save the session for later usage. | Go back to the '''Session''' category (in the top left) and save the session for later usage. | ||
Upload the public key to the remote server as described on [http://klaus.ede.hih.au.dk/index.php/Linux_hints#The_manual_way here]. | Upload the public key to the remote server as described on [http://klaus.ede.hih.au.dk/index.php/Linux_hints#The_manual_way here]. | ||
Revision as of 08:50, 26 September 2013
Putty for Windows can be downloaded from here.
Install the complete package in a convenient directory.
In Control Panel search for Path. Choose Click to edit the System environment variables.
In the dialogue click on Environment Variables. Select the PATH in the System Variables section and click Edit. Type a semicolon (;) and then add the Putty's installation path to the end of the variable value. Save your changes.
Generate a private and public keypair by executing in a cmd-console the program puttygen. Click Generate - follow the instructions. Save the Public and Private key in a convenient directory, where you can find it later.
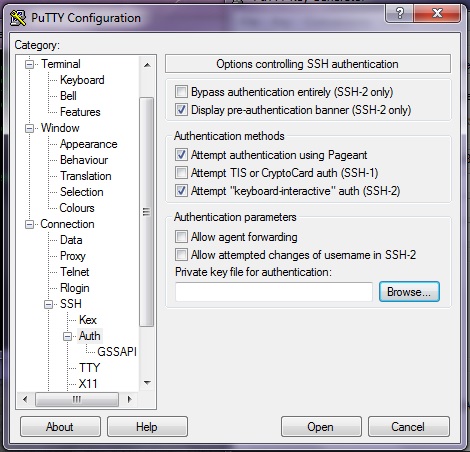
In Putty attach your Private key by loading a profile (like bren@school) and find in the configuration as shown below.
Select the Data category and enter your Auto login username (e.g. E12Kenneth).
Go back to the Session category (in the top left) and save the session for later usage.
Upload the public key to the remote server as described on here.
