Difference between revisions of "Virtual Machine on Fedora"
(Created page with 'Be sure to have installed libvirt - '''yum install @virtualization''' should get the most necessary item installed. Next ensure that the virtualisation is started <source lang=…') |
|||
| (2 intermediate revisions by the same user not shown) | |||
| Line 4: | Line 4: | ||
<source lang="bash"> | <source lang="bash"> | ||
| − | ] | + | ]$ systemctl start libvirtd |
</source> | </source> | ||
| Line 10: | Line 10: | ||
<source lang="bash"> | <source lang="bash"> | ||
| − | ] | + | ]$ systenctl enable libvirtd.service |
</source> | </source> | ||
| Line 16: | Line 16: | ||
[[File:Virtual-running-kvm.png]] | [[File:Virtual-running-kvm.png]] | ||
| + | |||
| + | '''Notice the Hypervisor''' | ||
| + | |||
| + | ===Networking=== | ||
| + | |||
| + | I have had some trouble accessing the network from the virtuals. | ||
| + | |||
| + | I found these [http://wiki.libvirt.org/page/Networking instructions] and performed as shown below while logged in as standard user: | ||
| + | |||
| + | <source lang="bash"> | ||
| + | ]$ virsh net-list --all | ||
| + | Name State Autostart | ||
| + | ----------------------------------------- | ||
| + | default active yes | ||
| + | |||
| + | ]$ virsh net-define /usr/share/libvirt/networks/default.xml | ||
| + | Network default defined from /usr/share/libvirt/networks/default.xml | ||
| + | ]$ virsh net-autostart default | ||
| + | Network default marked as autostarted | ||
| + | ]$ virsh net-start default | ||
| + | Network default started | ||
| + | |||
| + | ]$ brctl show | ||
| + | bridge name bridge id STP enabled interfaces | ||
| + | virbr0 8000.000000000000 yes | ||
| + | </source> | ||
| + | |||
| + | Finally, as root, in /etc/sysctl.d/99-sysctl.conf add this line | ||
| + | |||
| + | net.ipv4.ip_forward = 1 | ||
| + | |||
| + | And a reboot to get the networking up running with the new settings. | ||
| + | |||
| + | With two virtuals running I get this: | ||
| + | |||
| + | \source lang="bash"> | ||
| + | ]$ brctl show | ||
| + | bridge name bridge id STP enabled interfaces | ||
| + | virbr0 8000.fe5400249719 yes vnet0 | ||
| + | vnet1 | ||
| + | vnet2 | ||
| + | vnet3 | ||
| + | vnet4 | ||
| + | vnet5 | ||
| + | </source> | ||
Latest revision as of 13:47, 31 August 2014
Be sure to have installed libvirt - yum install @virtualization should get the most necessary item installed.
Next ensure that the virtualisation is started
]$ systemctl start libvirtdIf needed enable the libvirtd if you want it to be started at every boot
]$ systenctl enable libvirtd.service
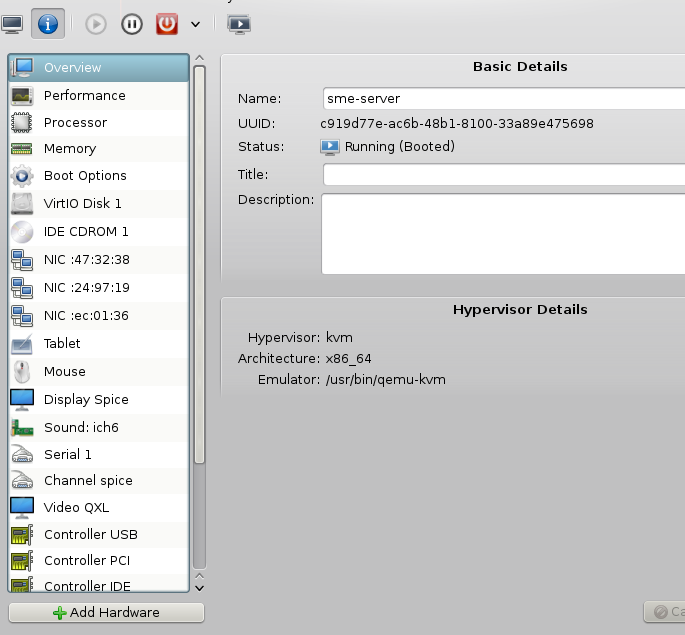
When installing a new virtual machine do ensure that it runs on the kvm virtualisation, not the qemu - qemu is an emulator and run very slow.
Notice the Hypervisor
Networking
I have had some trouble accessing the network from the virtuals.
I found these instructions and performed as shown below while logged in as standard user:
]$ virsh net-list --all
Name                 State      Autostart
-----------------------------------------
default              active     yes

]$ virsh net-define /usr/share/libvirt/networks/default.xml
Network default defined from /usr/share/libvirt/networks/default.xml
]$ virsh net-autostart default
Network default marked as autostarted
]$ virsh net-start default
Network default started

]$ brctl show
bridge name	bridge id		STP enabled	interfaces
virbr0		8000.000000000000	yes
Finally, as root, in /etc/sysctl.d/99-sysctl.conf add this line
net.ipv4.ip_forward = 1
And a reboot to get the networking up running with the new settings.
With two virtuals running I get this:
\source lang="bash"> ]$ brctl show bridge name bridge id STP enabled interfaces virbr0 8000.fe5400249719 yes vnet0
                                                       vnet1
                                                       vnet2
                                                       vnet3
                                                       vnet4
                                                       vnet5
</source>
